Saturday, November 20, 2010

Filing Cabinet or Room Decor?

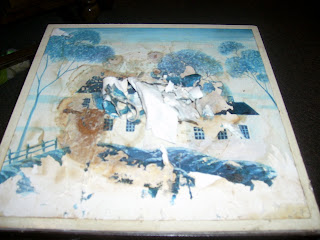
If your husband is anything like mine you will understand the craziness. Trying to keep a house, or in our case a small one bedroom apartment, cleaned up is the most difficult of tasks. He has notebooks, papers, mail, pictures, just stuff everywhere. So I thought, a filing cabinet would help him keep his stuff in order and out of the way. I found one at Goodwill for $4- what a deal! But oh the ugliness, especially when his "office" is secluded to a small corner of our living room. The cabinet while still functioning as a filing cabinet turn into an end table. As I began to loathe looking at this thing in my living room I decided to pull out my crafting kit. Here is what I came up with: Of course I have to start with the before pictures...

Before: If you couldn't tell...
One more before...


And now using a sponge brush, Mod Podge, a phone book and blue paint this is what I was able to accomplish: This is the exciting part...


I figured with the cabinet being filled with papers and other paraphernalia I really didn't need to make the inside look any better. And I have just two more for you...

One close up. And that is all I have for you for now. Next post will be another baby project I finished some time ago.


Tuesday, November 2, 2010

An Ugly Table : Turned Eye Candy


The last couple projects I've shared were more baby inspired. This one is just for me. I've had a table that was so ugly to look at that I kept it hidden with a huge scarf. This is it in all its ugliness...
I looked at it and thought I might as well get rid of it but couldn't bring my self to do so. And after seeing all that this wonderful woman does here--> http://modpodgerocks.blogspot.com/  <--I though, "I can do something like that!" All I can say is that I was and am rather pleased with myself and the out come of my renewed table.
I had 4 ingredients to help me along with this and they were: clearanced yellow spray paint, fabric left over from baby projects, 1 scrapbook page and the Magical Awesomeness in a jar: Mod Podge. I made a table worth showing off... And here it is folks:

The newest addition to our living room! As for the chair in the back ground of this last picture I have no comment, it is ugly and worn but it is Ssoo comfortable. Maybe one day I'll get up the nerve to try and reupholster it. Probably not, I'll just keep an eye out for a good find on Craigslist. Actually probably not there either, that is in fact where I got this chair. Anyway I'll figure something out but for now I'll just enjoy my one finished living room project.

Sunday, October 10, 2010

For Baby!

 
As I have said before I procrastinate... I began this project with high hopes. It turned out well however, it took forever to do by hand so I only finished 4 altogether. I will eventually make more but I'm going to have to wait until I spend some quality, learning to use a sewing machine, time with grandma. I'm pretty excited about that. Anyway here goes... I start off by making my own patterns using cardboard. 
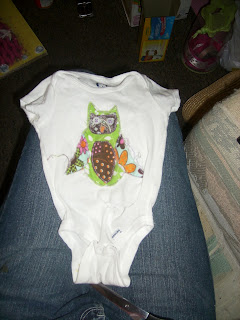
I had left over onesies from a baby shower game and decided to give plain white onesies some fun flare.
Using some fabric I had on hand I used my cardboard cutouts to make these:


As you can see the onesies didn't turn out too bad but would have been finished faster and more efficiently if they had not been sewn by hand. Nonetheless I'm pleased with the results and there are no complaints from the baby. :)
Even after baby out grows the onesie you can cutout the pattern and reuse it on a new bigger onesie or as I did, frame it for baby room decor.

I'm still figuring out how to use the photo thing on here, that may explain why my pictures are everywhere on the page.

Wednesday, October 6, 2010

Rockin' Style


While I was busying myself with stuff for baby I came across this rocking horse--->


I couldn't pass it up for a grand total of $10- Oh, how I love Craigslist!


I wasn't so keen on the tail and mane so I thought I could make it better. Not knowing if I were having a boy or girl I went with a brown and turquoise yarn from RedHeart.


I turned the drab mane into something not so sorry looking...
So the horse went from drab to fab--->

After I had my daughter, I decided to put a cute flower clip to the mane to add a girlie touch. This was a super fast and super easy project to spruce up baby decor.

I love to do simple and easy projects that make a big difference in a short period of time. I'm not the most patient person when it comes to doing crafts. I am a procrastinator as well, therefore if the project I'm working on doesn't get finished quickly it usually sits around awhile before it gets finished. (If at all.) I have a scarf in the closet that is about done, its been there over two years now. I'm not the proudest of that fact but that's how I roll. :)

I should be getting baby dressed, we're going to pick daddy up from work. He had a flat this morning...

Thursday, September 23, 2010

As I begin...

Hello! Thank you, for taking time out of your busy day to read the words I have written here. This is my very first attempt at Blogging and I hope with time I can master the etiquette. First things first, I'll tell you a little about my self, I'm 23 and married to a musician which isn't the easiest of professions to be married to. It makes for long hours, days and weeks away from home but we manage to make it work seamlessly.

We have recently been blessed with a wonderful baby girl! The best thing I could ever hope to have.

Before baby, my babies were Benny and Ellie a Chion (Papillon and Chihuahua mix) and a Dachshund. I still love my dogs and yes they are still my "kids" but baby takes the cake on the ranking chart.  I mean come on you saw that face up there. Such a Cutie Pie!
 I do believe the crafting bug bit me while I was pregnant with baby. I had always liked to do little craft projects but now I feel like I can't read enough or make, re-vamp, or anything fast enough. So as my first blog comes to a finish I will leave you with this...my first piece of room decor for baby: added some paint and ribbon and this is what I came up with!
Quark board-Before
Quark board-After